
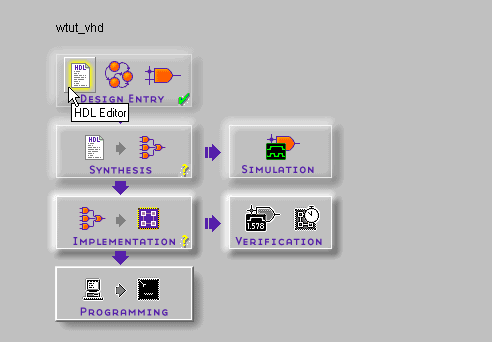
Design Entry
In this hierarchical design, you will examine HDL files, correct syntax errors, create an HDL macro, and add a LogiBLOX module. This tutorial gives you experience with creating and using each type of design macro so that you can apply these procedures to your own design.
Adding Source Files
You must add HDL files to the project before they can be synthesized. Four HDL files have already been added to this project, but have not yet been analyzed. Use Synthesis  Analyze All HDL Source Files to update these files.
Now add the remaining HDL file to the project. Select Synthesis Add HDL Source Files and select SMALLCNTR.VHD or SMALLCNTR.V from the project directory.
This file will be analyzed when it is added to the project. HDL files that have been added to the project always have one of four status indicators associated with the file. These indicators are:
- A red question mark means the file has been modified and needs to be re-analyzed. Right-click the file and select Analyze.

- A red X means errors have been found. Select this file and examine the errors under the HDL Errors tab. Errors are also given in the HDL Editor.

- A red exclamation point means warnings have been issued. Select the file and examine the warnings under the HDL Warnings tab. Many warnings can be safely ignored.

- A green check means that the file is up-to-date with no errors or warnings.

Correcting HDL errors
The SMALLCNTR design contains a syntax error that must be corrected. The red “x” next to the filename indicates an error was found during analysis. The Project Manager reports errors in red and warnings in blue in the console.
NOTETo open help on Express errors or warnings, select the error or message in the HDL Error or Warning tab, then press the F1 key.
|
- Open SMALLCNTR.VHD or SMALLCNTR.V in the HDL Editor by double clicking the file name in the Files tab of the Hierarchy Browser.
- Correct any errors in the HDL source file. The comments next to the error explain this simple fix.
- Select File Save to save the file.
- Re-analyze the file by selecting Synthesis Check Syntax, in the HDL Editor or by right-clicking the HDL file in the Project Manager and selecting Analyze.
Starting the HDL Editor
There are three different ways to open the HDL Editor tool.
- From the Flow tab, click the HDL icon within the Design Entry phase button.
or,
- Double click an HDL file in the Files tab.
or,
- Right-click an HDL file in the Files tab and select Edit.
If you need to stop the tutorial at any time, save your work by selecting File Save from the menus.
Creating an HDL-Based Module
With Foundation, you can easily create modules from HDL code. The HDL code is connected to your top-level HDL design through instantiation and compiled with the rest of the design.
You will create a new HDL module. This macro serves to convert the two 4-bit outputs of the CNT60 module into a 7-segment LED display format.
Using the HDL Design Wizard and HDL Editor
You enter the name and ports of the component in the HDL Wizard and the Wizard creates a “skeleton” HDL file which you can complete with the remainder of your code.
- From the Flow tab in the Project Manager, click the HDL Editor button.
- A dialog box opens, asking if you want to create an empty HDL file, select an existing HDL file, or use the HDL Wizard to create a new file. Click the radio button next to Use HDL Design Wizard and click OK.
- Follow the instructions from the Wizard. When you are prompted for a preferred HDL language, choose whichever one you want, VHDL or Verilog.
- When you are prompted for a file name, type HEX2LED.
- The HEX2LED component has a 4-bit input port named HEX and a 7-bit output port named LED. To enter these ports, first click the New button in the Ports dialog box. Select Input as the direction and type HEX in the Name field. Then, click the arrow next to the Bus field to select 3:0, which is the width of the bus. In the Name field, you should now see HEX[3:0], and a corresponding pin should appear on the symbol diagram on the left.
- Repeat the previous step for the LED[6:0] output bus. Be sure that the direction is set to Output.
- Click Finish to complete the Wizard session. A “skeleton” HDL file now displays in the HDL Editor.
In the HDL Editor, the ports are already declared in the HDL file, and some of the basic file structure is already in place. Keywords are printed in red, comments in green, and values are gray. This color-coding enhances readability and recognition of typographical errors.
Using the Language Assistant
You use the templates in the Language Assistant for commonly used HDL constructs, as well as synthesis templates for commonly used logic components such as counters, D flip-flops, multiplexers, and global buffers. You can add your own templates to the Language Assistant for components or constructs you use often.
- To invoke the Language Assistant, select Tools Language Assistant from the HDL Editor pulldown menu.
- The Language Assistant is divided into three sections: Language Templates, Synthesis Templates, and User Templates. To expand the view of any of these sections, click the + next to the topic. Click any of the listed templates to view the template in the right hand pane.
- Use the template called HEX2LED Converter located under the Synthesis Templates heading. Locate this template and preview it in the right hand pane by clicking the template. This template provides source code to convert a 4-bit value to 7-segment LED display format.
- Before adding this template to your HDL file, be sure that the cursor in the HDL Editor is positioned below the line with the comments “<<enter your statements here>>” for VHDL. For Verilog, enter code after the “// Add your code here” line. When you use the template, the code is placed wherever the cursor currently is in the HDL Editor.
- To add the HEX2LED Converter template code, click the Use button in the Language Assistant while the HEX2LED Converter template is selected. The code is automatically placed in the HDL file.
- Close the Language Assistant by clicking the X in the upper right corner of the window.
- (Verilog only) After the “//add your declarations here” statement and before the HEX2LED converter that you just added, add the following line of code to the HDL file to allow an assignment.
reg LED;
- You now have complete and functional HDL code and can check the syntax using Synthesis Check Syntax.
- After you successfully complete the syntax check, save the file by selecting File Save from the HDL Editor.
- Add this HDL file to your current project by selecting Project Add to Project.
- Exit the HDL Editor.
Examining the Top-Level HDL
Open STOPWATCH.VHD or STOPWATCH.V in the HDL Editor. This is the top level of the design and consists mainly of the top level ports and connections to the lower hierarchical blocks. Two Xilinx library components have been instantiated in this HDL file: OSC4 and the BUFG.
OSC4: The XC4000 devices contain an on-chip oscillator that you can use to generate internal clock signals. To access the internal oscillator, you must instantiate the OSC4 component. Nominal clock frequencies of 8 MHz, 500 kHz, 16 kHz, 490 Hz, and 15 Hz are available and are specified by corresponding output pins of the OSC4 symbol. In the Watch design, you use the 15Hz clock output of the OSC4 component as the system clock in the design. The frequency of these clock signals is not precise. Do not use the OSC4 when you require a high degree of clock speed precision.
BUFG: All Xilinx devices contain a set of Global Buffers that provide low-skew distribution of high fanout signals. The number and type of global buffers differs depending on the Xilinx device family you want to target. Consult the Xilinx Libraries Guide for more information regarding the various types of global buffers available.
In the Watch design, a BUFG component drives the clock signal from the OSC4. The signal on the output of the BUFG is the buffered clock signal which drives all the clocks in the system. Express infers global clock buffers, but since this clock signal is generated by the instantiated OSC4 component, the BUFG must also be instantiated.
Consult the “Instantiated Components” appendix in the Foundation Series User Guide for a list of components that can be instantiated.
Creating a LogiBLOX Module
LogiBLOX is a graphical interactive design tool you use to create high-level modules such as counters, shift registers, RAM and multiplexers. You can customize and pre-optimize the modules to take advantage of the inherent architectural features of the Xilinx FPGA architectures, such as Fast Carry Logic for arithmetic functions, and on-chip RAM for dual-port and synchronous RAM.
In this section, you create a LogiBLOX module called Tenths. Tenths is a 10-bit one-hot encoded counter. It counts the tenths digit of the stopwatch's time value. The encoding is set to one-hot counter so that the digit is easily viewed on the FPGA Demo Board when downloaded. A series of LED lights display the Tenths digit, where one light will be on for each count of the tenths digit.
Running the LogiBLOX Module Selector
You select the type of module you want in the GUI of the LogiBLOX Module Selector dialog box as well as the specific features of the module. You can invoke this GUI from either the Project Manager, the HDL Editor, or the Schematic Editor. The operation of the tool is the same regardless of where you invoke it.
- If you have closed the HDL Editor, open STOPWATCH.VHD or STOPWATCH.V.
- From within the HDL Editor, select Synthesis LogiBLOX.
- The Setup window opens if this is your first call to the LogiBLOX module generator. If the Setup window does not open, click the Setup button. Enter the following items.
- Under the Device Family tab, use the pulldown to select xc4000e.
- Under the Options tab, select VHDL Template or Verilog Template, depending on the language you are using.
- If you plan to simulate with an HDL simulator, select Behavioral VHDL Netlist or Structural Verilog netlist, depending on the HDL simulator you want to use.
- Click OK when you have defined all of the options.
- Fill in the LogiBLOX Module Selector with the following settings.
- Module Type: Counters
Defines the type of module.
- Module Name: Tenths
Defines the name of the module.
- Bus Width: 10
Defines the width of the data bus. You either choose from the pulldown menu, or type in a value.
- Operation: Up
Defines how the counter will operate. This field is dependant on the type of module you select.
- Style: Maximum Speed
Defines the type of optimization strategy for the module. This dictates how the layout of the module is defined.
- Encoding: One Hot
Defines the register encoding for the module.
- Async Val: 0000000001
Defines the value of the module on power-up and reset.
- Check or uncheck the appropriate boxes on the module diagram so that only the following pins are used.
- Async. Control
- Clock Enable
- Q_OUT
- Terminal Count
- Click OK. The module is created and automatically added to the project library.
A number of files are added to the project directory. These files follow:
- TENTHS.NGC
This file is the netlist that is used during the Translate phase of implementation.
- TENTHS.VHI or TENTHS.VEI
This is the instantiation template that is used to incorporate the LogiBLOX module in your source HDL.
- TENTHS.VHD or TENTHS.V
This is the HDL file to be used only for functional simulation. Do not attempt to synthesize this file. Also do not add this file to the Foundation project.
- TENTHS.MOD
This file stores the configuration information for the Tenths module.
- LOGIBLOX.INI
This file stores the LogiBLOX configuration for the project.
Instantiating the LogiBLOX Module in the HDL Code
VHDL Flow
- If you have closed the HDL Editor, open STOPWATCH.VHD.
- Place your cursor after the line that states:
“-- Place the LogiBLOX Component Declaration for Tenths here”
Select Edit Insert File and choose Tenths.vhi. The VHDL template file for the LogiBLOX instantiation is inserted.
The Component Declaration does not need to be modified.
- Highlight the inserted code from “--Component Instantiation” to “TERM_CNT=>);”. Select Edit Cut.
- Place the cursor after the line that states:
“--Place the LogiBLOX Component Instantiation for Tenths here.”
Select Edit Paste to place the instantiation here.
Change “instance_name” to “XCOUNTER”.
- Edit this instantiated code to connect the signals in the Stopwatch design to the ports of the LogiBLOX module. The completed code looks like the following.
- Save the design and close the HDL Editor.
Verilog Flow
- If you have closed the HDL Editor, open STOPWATCH.V
- Place your cursor after the line that states:
“-- Place the LogiBLOX Module Declaration for Tenths here”
This line is at the end of the file.
Select Edit Insert File and choose Tenths.vei. The Verilog template file for the LogiBLOX instantiation is inserted.
The Component Declaration does not need to be modified.
NOTEAlternatively, the remaining module declaration can be placed in a new Verilog file (name it TENTHS.V) and added to the project. Be careful not to overwrite the Verilog simulation model, also named TENTHS.V, if one has been created. This module declaration is required to define the port directions of the ports of the LogiBLOX module.
|
- Highlight the inserted code from “Tenths instance_name” to “.TERM_CNT=());”. Select Edit Cut.
- Place the cursor after the line that states:
“--Place the LogiBLOX Component Instantiation for Tenths here.”
Select Edit Paste to place the instantiation here.
Change “instance_name” to “XCOUNTER”.
- Edit this code to connect the signals in the Stopwatch design to the ports of the LogiBLOX module. The completed code is shown in the following figure.
- Save the design and close the HDL Editor.
