|
|
|
|
|
|
From the Project Manager's Tools menu, you can select Tools ![]() Implementation to access the additional implementation tools described below.
Implementation to access the additional implementation tools described below.
You can invoke the Xilinx implementation Constraints Editor by selecting Tools ![]() Implementation
Implementation ![]() Constraints Editor.
Constraints Editor.
The Xilinx Constraints Editor is a Graphical User Interface (GUI) that provides you with a convenient way to create user constraints files without having to learn constraints syntax.
The Constraints Editor interface consists of a main window, three tab windows for creating global, port, and advanced constraints, and a number of dialog boxes.
Information on the Xilinx Constraints Editor can be found in the Constraints Editor Guide, an online book.
You can invoke and run the Flow Engine manually by selecting Tools ![]() Implementation
Implementation ![]() Flow Engine. Be aware that when invoked from the Tools menu, Flow Engine processing is not under Project Management control.
Flow Engine. Be aware that when invoked from the Tools menu, Flow Engine processing is not under Project Management control.
If you want to implement your design in separate steps instead of automatically with the Implementation phase button, use the following procedure.
Optionally, you can select Setup ![]() Stop After and select where to stop processing.
Stop After and select where to stop processing.
You can use re-entrant routing to further route an already routed design. The design maintains its current routing and additional routing is added. You can reroute connections by running cost-based cleanup, delay-based cleanup, and additional re-entrant route passes. Cleanup passes attempt to minimize the delays on all nets and decrease the number of routing resources used. Cost-based cleanup routing is faster while delay-based cleanup is more intensive.
Re-entrant routing offers the following advantages.
Note: Re-entrant Routing is supported for the FPGA device families only.
Use the following procedure to perform Re-Entrant Routing.
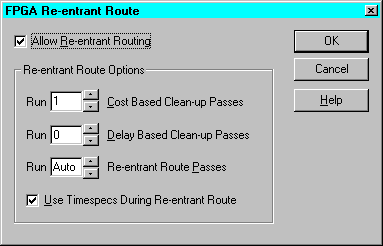
Note: If you run both cost-based and delay-based cleanup passes, the cost-based passes run first.
Since your design is already implemented, step back to the beginning of Place and Route using the Step Backward button at the bottom of the Flow Engine, and then click the button to start again.
You can configure the implementation flow and control certain aspects of the Flow Engine interface. To configure the flow, use the following procedure.
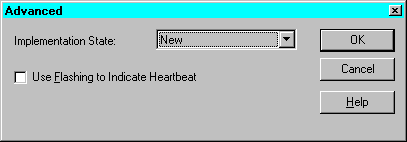
Note: The advanced setting is not used in normal Flow Engine use. It is used if some processing on the design was performed outside of the Project Manager or Flow Engine framework, such as in the FPGA Editor. It can also be used if you ran the Flow Engine Step Back button by mistake and want to reset the implementation state to its original state.
The Floorplanner is a graphical placement tool that gives you control over placing a design into a target FPGA. You can access the Floorplanner through Tools ![]() Implementation
Implementation ![]() Floorplanner on the Project Manager's menu bar.
Floorplanner on the Project Manager's menu bar.
Floorplanning is an optional methodology to help you improve performance and density of a fully, automatically placed and routed design. Floorplanning is particularly useful on structured designs and data path logic. With the Floorplanner, you see where to place logic in the floorplan for optimal results, placing data paths exactly at the desired location on the die.
With the Floorplanner, you can floorplan your design prior to or after running PAR. In an iterative design flow, you floorplan and place and route, interactively. You can modify the logic placement in the Floorplan window as often as necessary to achieve your design goals. You can save the iterations of your floorplanned design to use later as a constraints file for PAR.
The Floorplanner displays a hierarchical representation of the design in the Design Hierarchy window using hierarchy structure lines and colors to distinguish the different hierarchical levels. The Floorplan window displays the floorplan of the target device into which you place logic from the hierarchy. The following figure shows the windows on the PC version.
Logic symbols represent each level of hierarchy in the Design Hierarchy window. You can modify that hierarchy in the Floorplanner without changing the original design.
You use the mouse to select the logic from the Design Hierarchy window and place it in the FPGA represented in the Floorplan window.
Alternatively, you can invoke the Floorplanner after running the automatic place and route tools to view and possibly improve the results of the automatic implementation.
The FPGA Editor is a graphical application for displaying and configuring FPGAs. You can use the FPGA Editor to place and route critical components before running the automatic place and route tools on your designs. You can also use the FPGA Editor to manually finish placement and routing if the routing program does not completely route your design. In addition, the FPGA Editor reads from and writes to the Physical Constraints File (PCF).
For a description of the FPGA Editor, see the FPGA Editor Guide, an online book.
You can access the FPGA Editor through Tools ![]() Implementation
Implementation ![]() FPGA Editor on the Project Manager's menu bar.
FPGA Editor on the Project Manager's menu bar.
The ChipViewer provides a graphical view of the CPLD fitting report. With this tool you can examine inputs and outputs, macrocell details, equations, and pin assignments. You can examine both pre-fitting and post-fitting results.
More information on using the CPLD ChipViewer is available in that tool's online help (Tools ![]() Implementation
Implementation ![]() CPLD ChipViewer
CPLD ChipViewer ![]() Help) or from the Umbrella Help menu accessed by Help
Help) or from the Umbrella Help menu accessed by Help ![]() Foundation Help Contents
Foundation Help Contents ![]() Advanced Tools
Advanced Tools ![]() ChipViewer.
ChipViewer.
You can automatically generate pin locking constraints in your UCF file for use with other Xilinx implementation tools. Pinout information is taken from a placed NCD file for FPGAs or a fitted GYD file for CPLDs.
To lock device pins, do the following.
If you want to view the report after you have dismissed the Lock Pins Status dialog box, use Tools ![]() Implementation
Implementation ![]() Lock Pins Report from the Project Manager.
Lock Pins Report from the Project Manager.